Pines_N_Tines
Active Member
- Messages
- 747
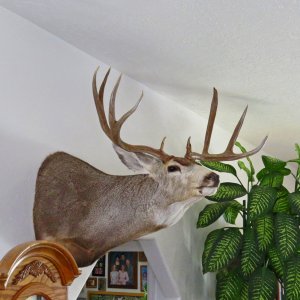
So far I give myself an A for effort but I'm not quite ready to give myself a high grade for the outcome. This is the first time that I've tried to refurbish a shed. Many of the hard-core shed hunters on here probably wouldn't give this set the time of day. It has meaning to me, in that this set is the first that my 8-year-old found/aquired on his own and the bases are awesome with 19 protrusions over 1/2", 10 of which are at least 1" and scorable. He found the side that had not been chew by coyotes and then did a fine job of talking one of the others in our party out of the chewed side to complete his set.
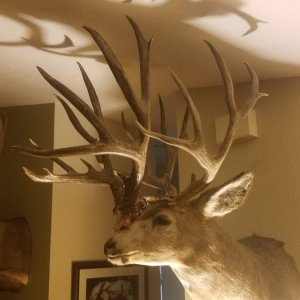
Here it is


We did good that day. His set is circled along with a fresh brown 4 point that I picked up close to where my son found his. I used the 4 point as my basis for color matching.

The set had definitely weathered in the sun for several years. It had some severe cracking and chalking. They coyote chews didn't help either.
Here's how they looked.


I wish I could remember the name of the poster that posted up a shed that he did a couple years ago. I would like to give him credit. I used the method he described to fix this set. He used wood filler for the cracks, lots of sanding for the chalk, and Van Dyke's Brush on Wipe Off antler paint. FIrst I had to deal with the missing/coyote chewed ends. I didn't have any donor muley shed that matched the mass and curvature. I did have some old elk bone that became a great donor. I cut the tips off, drilled them and super glued 1/4" bolts into the drilled holes.


After more wood filler to close the gaps, a dremel tool around the bases, and final sanding it was time for the van dykes antler paint. I used all four colors in the kit to achieve the closest color of the four point.

Here's the four point ATL

Here's the fresh brown four point with the refurbished set

As I mentioned earlier the bases make this otherwise decent three point set a one of a kind set.

Oops! I meant >1/2" in the photo.
My son is happy with his refurbished set. I haven't sealed the color yet as I may try to lighten it just a little to get an exact match. Next step is a mountain mikes skull.
Here it is
We did good that day. His set is circled along with a fresh brown 4 point that I picked up close to where my son found his. I used the 4 point as my basis for color matching.
The set had definitely weathered in the sun for several years. It had some severe cracking and chalking. They coyote chews didn't help either.
Here's how they looked.
I wish I could remember the name of the poster that posted up a shed that he did a couple years ago. I would like to give him credit. I used the method he described to fix this set. He used wood filler for the cracks, lots of sanding for the chalk, and Van Dyke's Brush on Wipe Off antler paint. FIrst I had to deal with the missing/coyote chewed ends. I didn't have any donor muley shed that matched the mass and curvature. I did have some old elk bone that became a great donor. I cut the tips off, drilled them and super glued 1/4" bolts into the drilled holes.
After more wood filler to close the gaps, a dremel tool around the bases, and final sanding it was time for the van dykes antler paint. I used all four colors in the kit to achieve the closest color of the four point.
Here's the four point ATL
Here's the fresh brown four point with the refurbished set
As I mentioned earlier the bases make this otherwise decent three point set a one of a kind set.
Oops! I meant >1/2" in the photo.
My son is happy with his refurbished set. I haven't sealed the color yet as I may try to lighten it just a little to get an exact match. Next step is a mountain mikes skull.